Python Celery
On backend side, we sometimes need asynchronous tasks to be completed by the server. Those tasks generally don't return a response at that moment. They are also used for periodic jobs.
Example: We need to save some different sizes photos that user has uploaded. We can just receive original photo and process later. We don't need to do it synchronously, and it will take time if we process it synchronously. Server performance, especially response time, will also suffer from this operation. Also you can scale pretty easy by adding more servers to do the "photo processing", resizing etc.
Since you decoupled your photo processing from your web application, you have more flexibility. Ex. you can add more servers under high load and scale up, and when the storm is over you can also scale down.
So we use "Background Tasks". They are distributable and scalable. python-celery is one of the packages provides background tasks.
How it works?
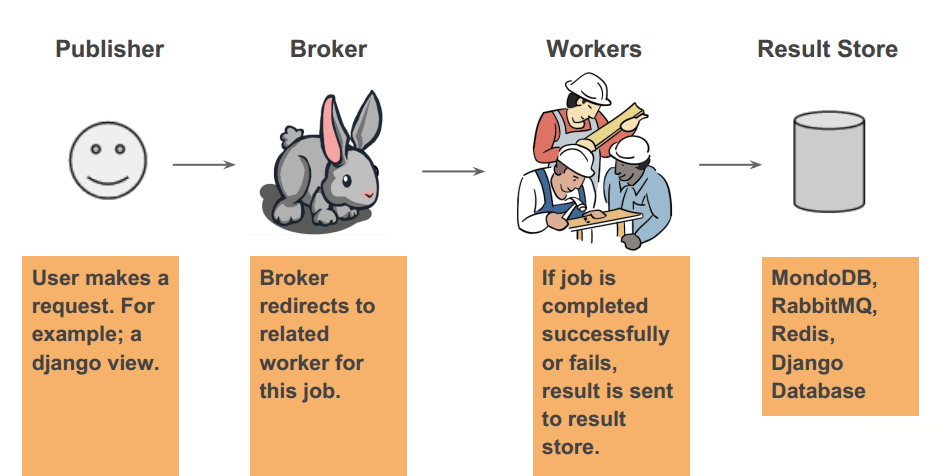
Background tasks have 4 type of section.
-
Publisher: It sends a message to the broker, to start tasks.
-
Broker: It receives process to worker from the client. It is also doing this job in a specific order queuing system. (AMQP)
-
Worker: It is running the task according to the message from the broker. That system can be distributed.
-
Result Store: When the task process finished, task result stored a DB system.

Install
First we start with the broker. I choose rabbitMQ as the broker, because it is very strong as a broker and easy to use. Let's install rabbitMQ.
apt-get install rabbitmq-server
After installing the rabbitMQ, we have to create a user and virtual host for using with python-celery. Just following these commands.
rabbitmqctl add_user celeryuser celery
rabbitmqctl add_vhost celeryvhost
rabbitmqctl set_permissions -p celeryvhost celeryuser ".*" ".*" ".*"
service rabbitmq-server restart
As you can guess, we use python-celery for worker.
pip install celery
We need a DB system for result store. Result store comes disabled as default on celery. If you need a result store, you need to enable it on the celery config file. As you can guess, a result store is responsible to save results of tasks, which task run, when they've run, or which tasks failed.
We could use non-relation DB system in here. Because this kind of system-generated log data doesn't have any relation. We need high write throughput.
I am usually using redis as a result store. If you are going to use redis with Celery, you have to install python Redis client.
 apt-get install redis-server

 pip install redis
Example
As I mentioned above we implement an image resize system. We will resize an image that come from the user and we will categorize in a folder.
First we implement celery configuration.
# Adding rabbitMQ info for broker settings.
# amqp://<username>:<password>@localhost:5672/<virtual_host>
BROKER_URL = 'amqp://celeryuser:celery@localhost:5672/celeryvhost'

# Using the database to store task state and results
CELERY_RESULT_BACKEND = 'redis://localhost:6379/0'

# List of modules to import when celery starts.
CELERY_IMPORTS = ('tasks', )
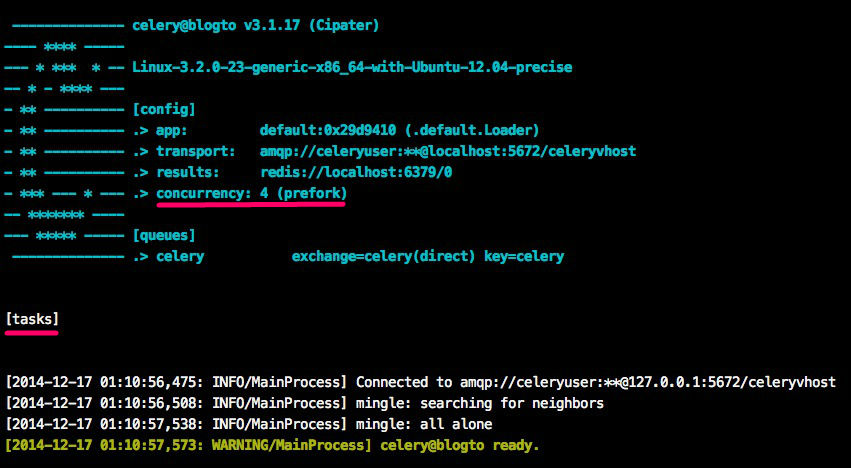
Let's check if python-celery is working, with the following command.
celery worker --loglevel=INFO

If celery works without any errors, you will see a screen like above. Let's look closely to red lines on this screenshot.
Concurrency is a term in computer science. In short, you use concurrency if you need to define a process running simultaneously in different threads.
The number of concurrency in celery is the number that can be executed concurrently. You can increase or decrease this number.
You can see task section because of we pass "--loglevel=INFO" parameter. In this section, you can see the list of the registered celery task.
Let's implement a task for celery.
import os
import Image

from celery.task import task
from constants import THUMBNAIL_SIZES, THUMBNAILS_DIRECTORY

# Every celery task function must be annotated with a celery task decorator.
# "@task" decorator registered function to celery


@task(name="thumbnail_generator")
def thumbnail_generator(image_path, image_name):
    for thumbnail_size in THUMBNAIL_SIZES:
        thumbnail_folder_name = "%sx%s/" % thumbnail_size
        thumbnail_directory = THUMBNAILS_DIRECTORY + thumbnail_folder_name

        thumbnail_data = {
            "image_name": os.path.splitext(image_name)[0],
            "width": thumbnail_size[0],
            "height": thumbnail_size[1]
        }
        thumbnail_name = "%(image_name)s_%(width)sx%(height)s.jpg" % thumbnail_data
        thumbnail_path = thumbnail_directory + thumbnail_name

        image = Image.open(image_path)
        image.thumbnail(thumbnail_size)
        image.save(thumbnail_path, "JPEG")
This celery task processes the images.
Lastly, we will implement publisher method. Celery must be running in order to run publisher.
import os

from tasks import thumbnail_generator
from constants import IMAGE_DIRECTORY, IMAGE_EXTENSIONS


def generate_thumbnails():
    files = os.listdir(IMAGE_DIRECTORY)
    for file in files:
        file_name, file_extension = os.path.splitext(file)
        if file_extension in IMAGE_EXTENSIONS:
            image_path = os.path.join(IMAGE_DIRECTORY, file_name)
            thumbnail_generator.delay(image_path, file_name)
We don't call celery task in classic way, instead, we call it like:
thumbnail_generater.delay()
We achieve this with "@task" decorator of celery. We can pass the same parameters to celery task like:
thumbnail_generater.delay(image_path, image_name)
If you call it in classic way like "thumbnail_generater()" it will run as normal python process.
I hope you enjoyed while reading. You find the example project on my github.